
I've seen this on several TRs that I've looked at, particularly those that I was looking at when searching to buy. After many years, and many steering wheel changes, the horn has been relocated....sometimes to some crappy looking aftermarket button on the dashboard, spoiling a nice wooden dashboard!!
I've seen very few TR4s with the original steering wheel, by now many have been changed to a Mota-lita or Mountney.
In a previous blog entry, I described the Stebel Air Horns that had been installed on Tina back in the early 70's and how these needed to be recommissioned and also rewired. The horn in Tina's case had been moved to a lever underneath the dashboard - so at least nothing was defaced.
I want to get the original horns working through the button in the centre of the Mountney steering wheel. After all, sometimes your reaction on needing the horn is to hit the wheel, not fumble under the dash - we'll save that under-dash switch for scaring people out of their underpants with a blast of the Air Horns!!!
So, How does the horn work...... Here is the steering wheel.
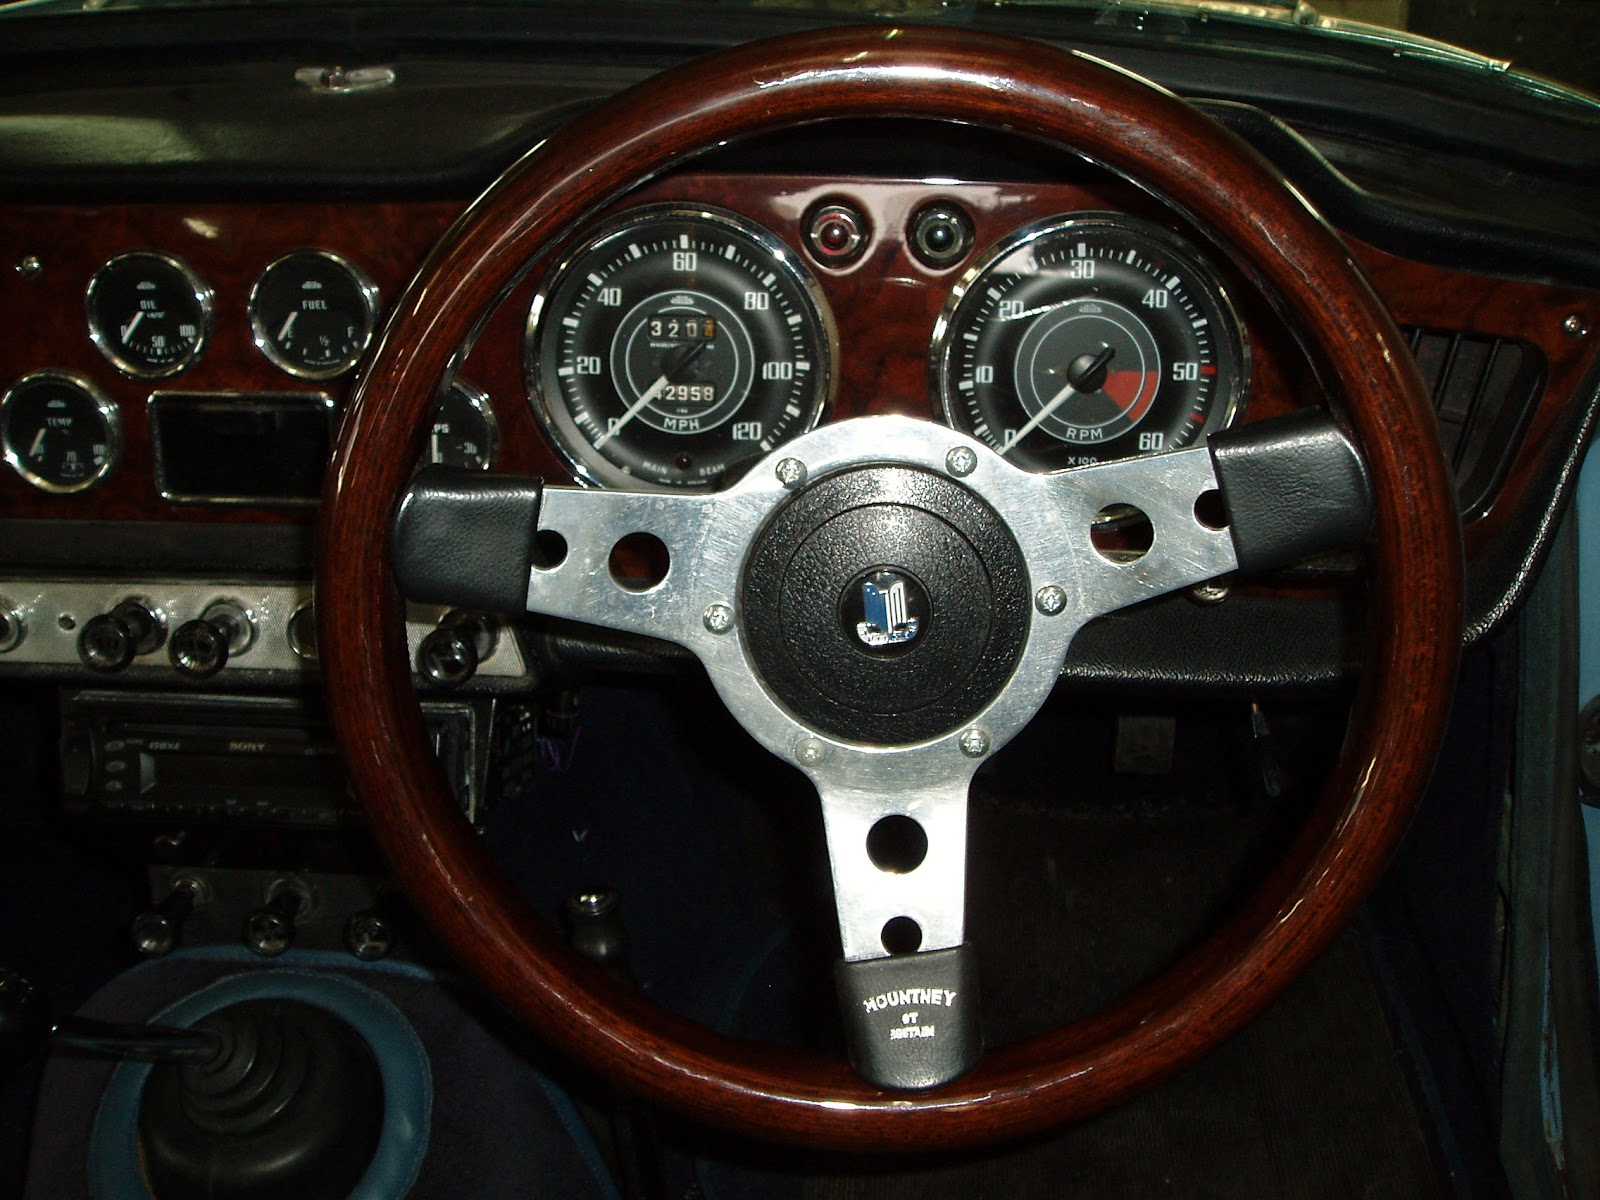
The centre of the wheel is the horn push, nice one this with the Triumph logo on it. This horn push will lever off with careful use of a screwdriver.....

That looks odd - doesn't look like there is anything there to make a connection with the horn... just a great big nut (which is too big for my socket sets) and a fat washer.. hmmmm......
Look what I found under the washer.......

A HOLE!!!
Yes, this is what I was looking for. Through the hole is a "Slip Ring" and the component that is missing is called a "Horn Brush" it is a spring loaded copper rod that sits between the slip ring and the horn push. Basically, as you turn the steering wheel the horn brush is fixed in contact with the horn push and slides around the slip ring thereby keeping both items in contact.
Inside the steering column, the horn is directly connected to the slip ring, the slip ring connects to the horn brush, the horn brush connects to the horn push on the steering wheel. Lets have another look at the horn push.....

I think (but not sure) that some horn push switches have a big contact in the middle, then as you push the horn you push the centre contact down to make contact with the horn brush. Clearly not the case here. What you can't see here is that on one section of the edge of this button is a metal plate to make contact with the steering column boss when it's inserted into the wheel. A quick check with an electrical meter showed that this horn push was an internal switch. Pressing the horn push made the electrical contact between the metal plate on the edge and the centre contact that you can see in the photo. So, that centre contact actually needs to be connected to the horn brush somehow.
So there we have it, that's how it works so how do we test it ........ push a screwdriver down the hole! Err, that didn't work, time to look at the wiring.
Of the wires entering the steering column for the horn, only the live feed enters, there is no earth. The horn earths through the steering column itself, down to the steering rack and onto the chassis. To confirm this I connected a test wire to earth, touched the steering column as it passes through the bulkhead in the engine bay, pushed a screwdriver down the hole in the steering wheel boss to earth the slip ring to the boss and ...... PARP! It works, we have an earth fault!
After numerous checks down the steering column, I believe I have two faults. This is one.
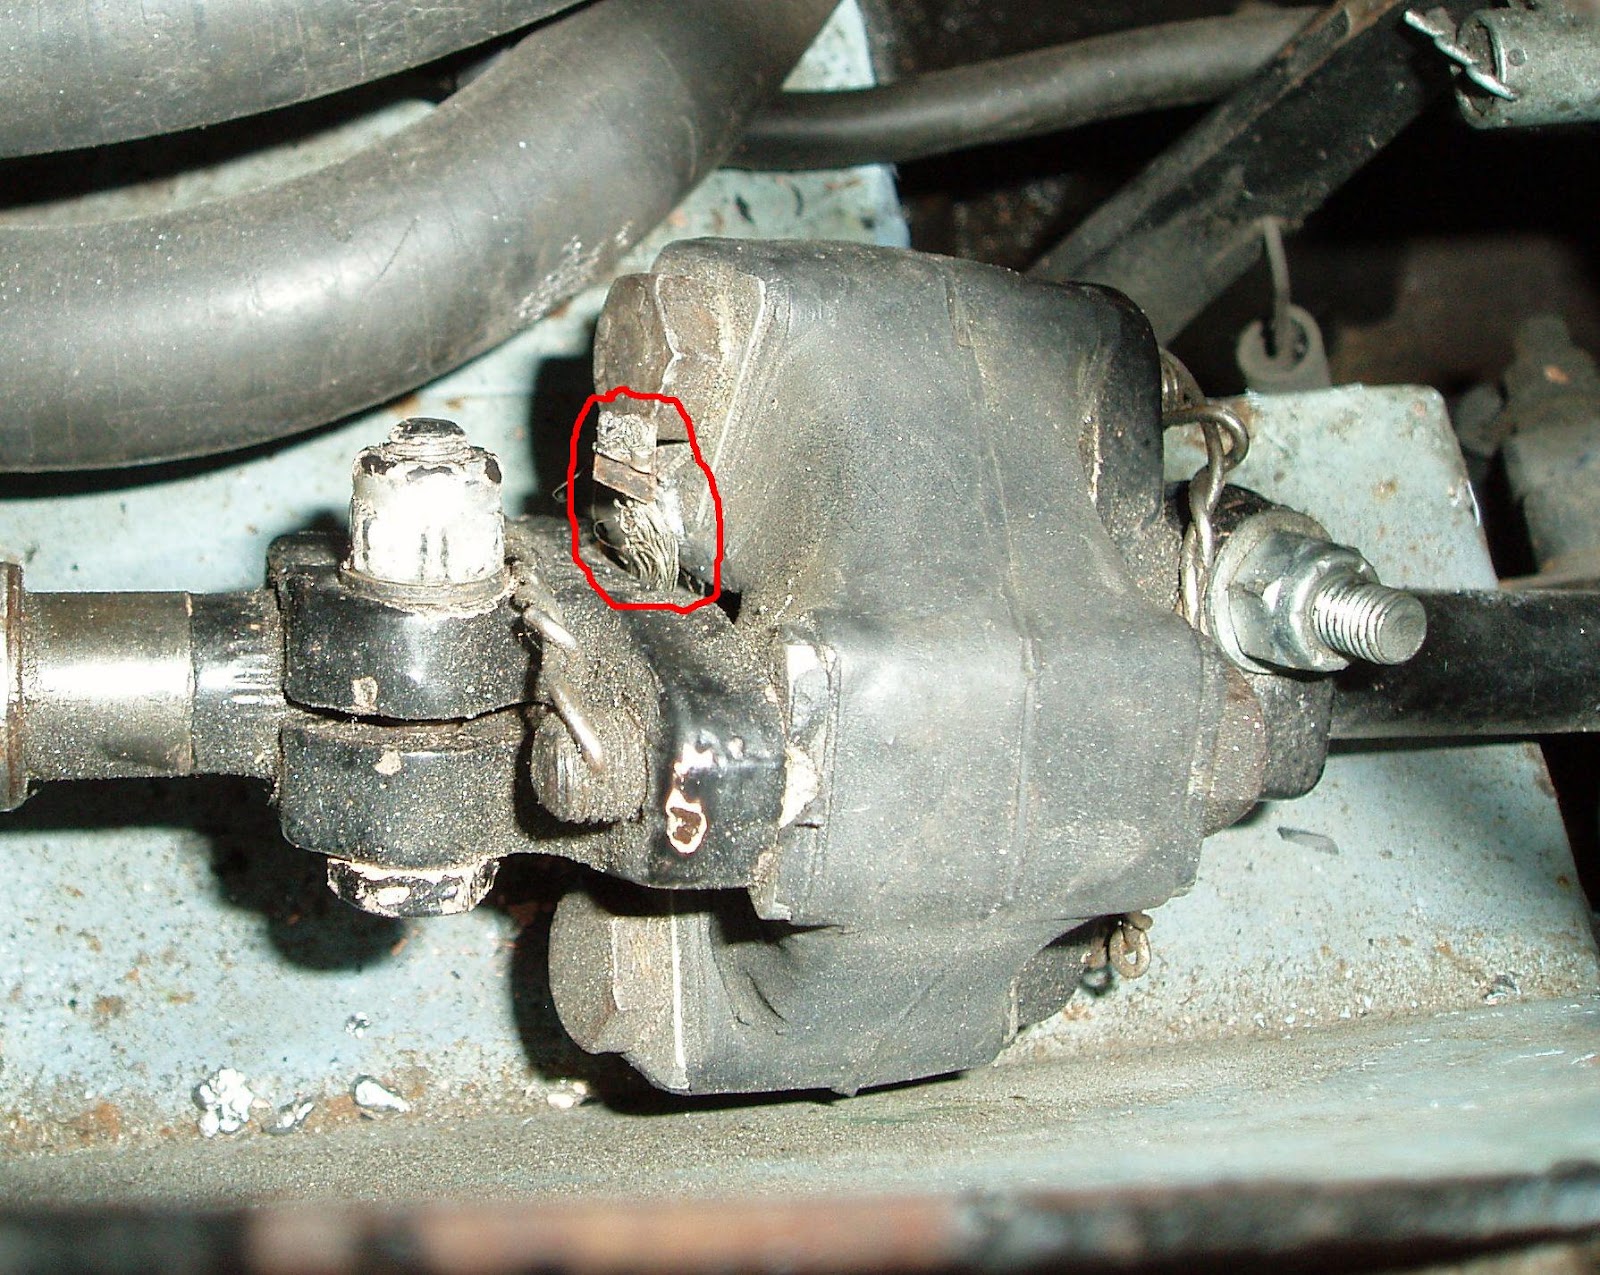
If you look carefully, the bit circled in red is an earth strap. it connects the earth in the steering column through the rubber flexible coupling to the next section of the steering column. This earth strap has broken and is no longer connected to the bolt head just above it. I will need to fix this, the easiest way will probably involve two ring connectors and a new wire through the centre of the coupling to connect to the clamping bolts. Replacing the earth strap properly will involve removing the carburettors and will be a much bigger job.
The final problem, I think is due the steering column having probably been replaced at some time......

Here you can see that the splines on the steering column are all nice and black. I believe that the black paint is insulating the column from the clamping mechanism. This could be the most difficult part to rectify, but the first trial will be to loosen the clamping bolts at each end, and then slide the steering column up and down within the splines to try to rub some of the paint off. This will avoid removing the carburettors!
The tests that I've made so far imply that I have the same lack of electrical continuity at this joint on both ends of the steering column - which leads me to believe that it has been replaced at some time.
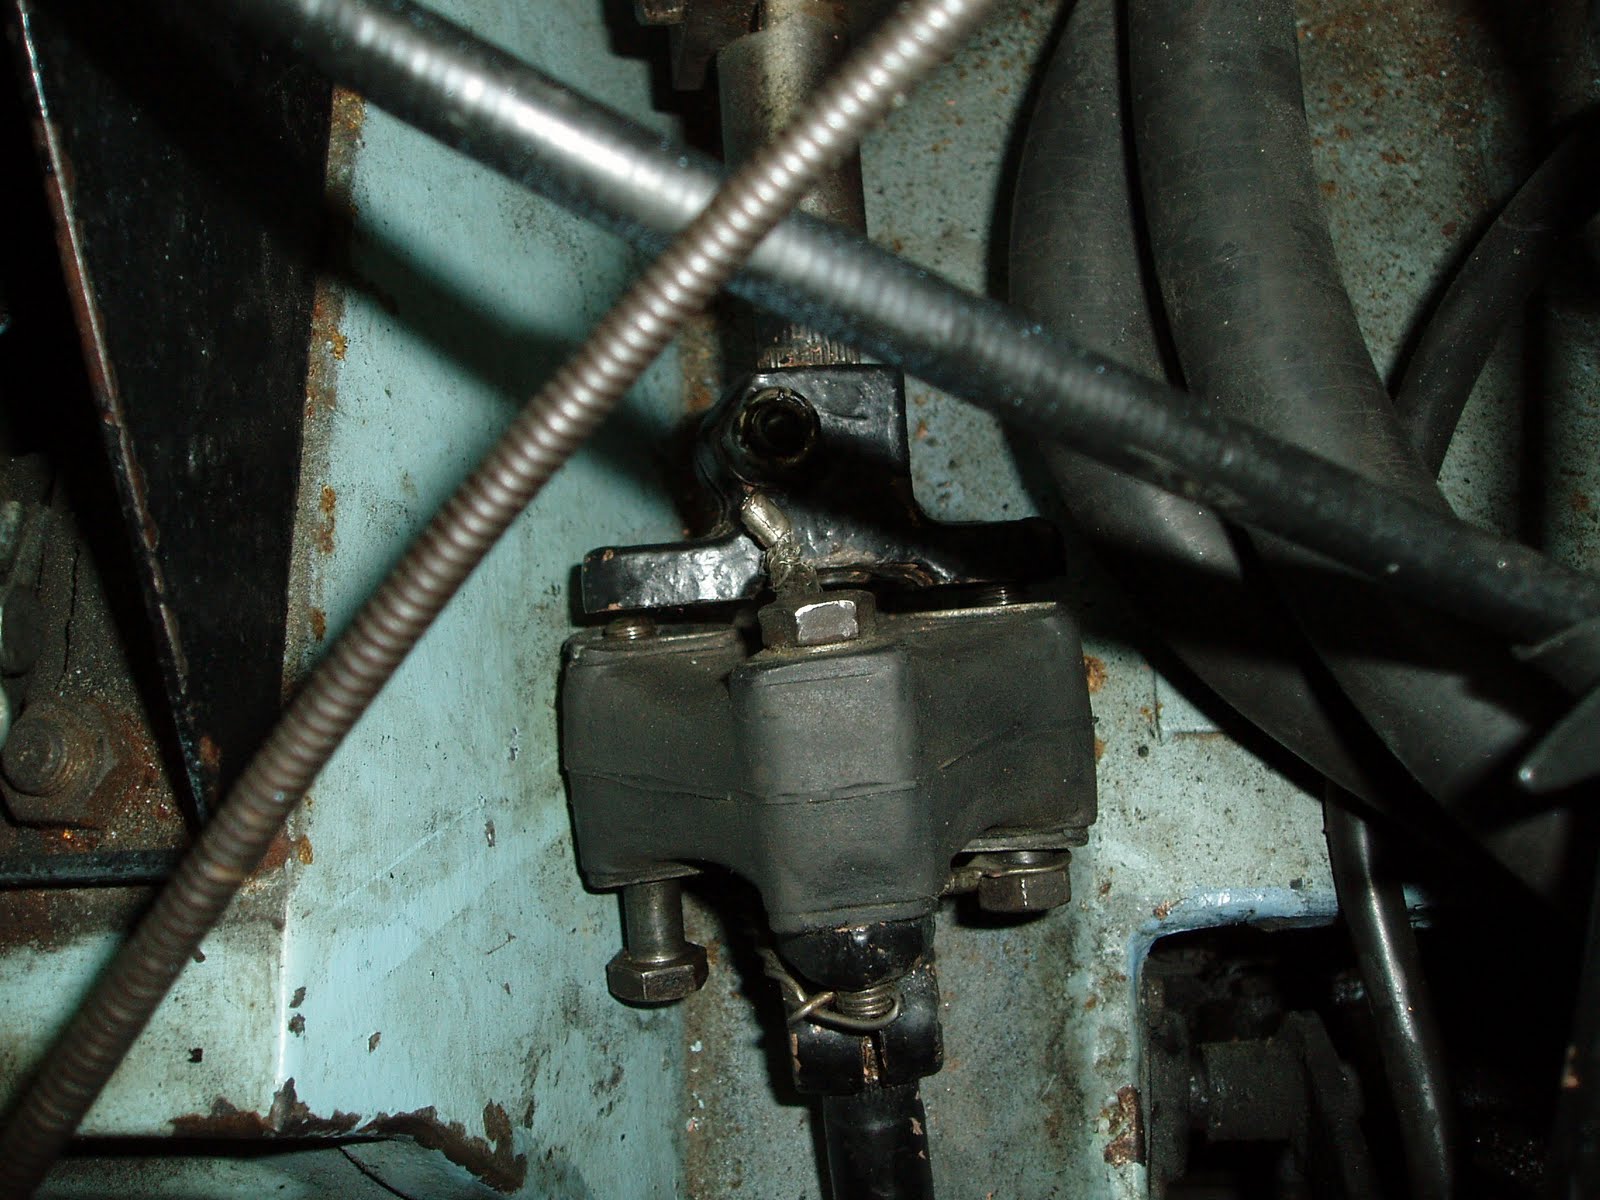
When you finally get to the bottom of the steering rack, this is the final earth lead to the chassis.

First I needed to disconnect the steering column flexible coupling (doughnut). Being naive, I started undoing the bolts.........

Well that shouldn't have been a surprise, the coupling was under tension and has now expanded, so there is no way I'm going to get that bolt back in the hole. I need some sort of clamp, asked around to my mates on the internet and we came up with this.....

Jubilee clips - where would we be without them. Anyway, I spent absolutely ages trying to get the steering column free without disconnecting the column at the rack (I'd been advised against doing that. The damn thing wouldn't move a millimetre. So I had to resort to a slightly more "Heath Robinson" way of fixing it.
I put the emery paper into the gap of the clamp and rubbed and rubbed until the paint was removed, then inserted the clamping bolt and wrapped as much wire as I could round the clamp bolt like this.

I did the same to the bottom clamp and managed to achieve a complete earth path all the way down the steering column.
Next, I needed to decide what to do with the horn push to enable the horn to operate. First I cut a "V" in the big washer to allow the horn brush to pass past it, and then bought a standard horn brush off eBay. The standard horn brush was way too long for my Mountney steering wheel, so I cut it down to size with a hacksaw.

You can see the horn brush at the 5 O'clock position and the "V" cut in the big washer to let it pass through.
Now in order for the horn to work, we need the horn brush to be in contact with the centre terminal of the horn push. I had some stuff in the garage given to me by a mate that is a bit like metal sellotape. It's definately conductive, and sticky. I cut some to shape and pushed it under the centre terminal so that it was in contact.

Now when the horn push is pushed on the steering wheel, the horn brush makes contact with the metal tape.
When the horn is pressed, the circuit is completed and the horn goes PARP!!
Please feel free to comment on my blog by clicking on the "comments" link below.

I've seen very few TR4s with the original steering wheel, by now many have been changed to a Mota-lita or Mountney.
In a previous blog entry, I described the Stebel Air Horns that had been installed on Tina back in the early 70's and how these needed to be recommissioned and also rewired. The horn in Tina's case had been moved to a lever underneath the dashboard - so at least nothing was defaced.
I want to get the original horns working through the button in the centre of the Mountney steering wheel. After all, sometimes your reaction on needing the horn is to hit the wheel, not fumble under the dash - we'll save that under-dash switch for scaring people out of their underpants with a blast of the Air Horns!!!
So, How does the horn work...... Here is the steering wheel.
The centre of the wheel is the horn push, nice one this with the Triumph logo on it. This horn push will lever off with careful use of a screwdriver.....
That looks odd - doesn't look like there is anything there to make a connection with the horn... just a great big nut (which is too big for my socket sets) and a fat washer.. hmmmm......
Look what I found under the washer.......
A HOLE!!!
Yes, this is what I was looking for. Through the hole is a "Slip Ring" and the component that is missing is called a "Horn Brush" it is a spring loaded copper rod that sits between the slip ring and the horn push. Basically, as you turn the steering wheel the horn brush is fixed in contact with the horn push and slides around the slip ring thereby keeping both items in contact.
Inside the steering column, the horn is directly connected to the slip ring, the slip ring connects to the horn brush, the horn brush connects to the horn push on the steering wheel. Lets have another look at the horn push.....
I think (but not sure) that some horn push switches have a big contact in the middle, then as you push the horn you push the centre contact down to make contact with the horn brush. Clearly not the case here. What you can't see here is that on one section of the edge of this button is a metal plate to make contact with the steering column boss when it's inserted into the wheel. A quick check with an electrical meter showed that this horn push was an internal switch. Pressing the horn push made the electrical contact between the metal plate on the edge and the centre contact that you can see in the photo. So, that centre contact actually needs to be connected to the horn brush somehow.
So there we have it, that's how it works so how do we test it ........ push a screwdriver down the hole! Err, that didn't work, time to look at the wiring.
Of the wires entering the steering column for the horn, only the live feed enters, there is no earth. The horn earths through the steering column itself, down to the steering rack and onto the chassis. To confirm this I connected a test wire to earth, touched the steering column as it passes through the bulkhead in the engine bay, pushed a screwdriver down the hole in the steering wheel boss to earth the slip ring to the boss and ...... PARP! It works, we have an earth fault!
After numerous checks down the steering column, I believe I have two faults. This is one.
If you look carefully, the bit circled in red is an earth strap. it connects the earth in the steering column through the rubber flexible coupling to the next section of the steering column. This earth strap has broken and is no longer connected to the bolt head just above it. I will need to fix this, the easiest way will probably involve two ring connectors and a new wire through the centre of the coupling to connect to the clamping bolts. Replacing the earth strap properly will involve removing the carburettors and will be a much bigger job.
The final problem, I think is due the steering column having probably been replaced at some time......
Here you can see that the splines on the steering column are all nice and black. I believe that the black paint is insulating the column from the clamping mechanism. This could be the most difficult part to rectify, but the first trial will be to loosen the clamping bolts at each end, and then slide the steering column up and down within the splines to try to rub some of the paint off. This will avoid removing the carburettors!
The tests that I've made so far imply that I have the same lack of electrical continuity at this joint on both ends of the steering column - which leads me to believe that it has been replaced at some time.
When you finally get to the bottom of the steering rack, this is the final earth lead to the chassis.
First I needed to disconnect the steering column flexible coupling (doughnut). Being naive, I started undoing the bolts.........
Well that shouldn't have been a surprise, the coupling was under tension and has now expanded, so there is no way I'm going to get that bolt back in the hole. I need some sort of clamp, asked around to my mates on the internet and we came up with this.....

Jubilee clips - where would we be without them. Anyway, I spent absolutely ages trying to get the steering column free without disconnecting the column at the rack (I'd been advised against doing that. The damn thing wouldn't move a millimetre. So I had to resort to a slightly more "Heath Robinson" way of fixing it.
I put the emery paper into the gap of the clamp and rubbed and rubbed until the paint was removed, then inserted the clamping bolt and wrapped as much wire as I could round the clamp bolt like this.

I did the same to the bottom clamp and managed to achieve a complete earth path all the way down the steering column.
Next, I needed to decide what to do with the horn push to enable the horn to operate. First I cut a "V" in the big washer to allow the horn brush to pass past it, and then bought a standard horn brush off eBay. The standard horn brush was way too long for my Mountney steering wheel, so I cut it down to size with a hacksaw.

You can see the horn brush at the 5 O'clock position and the "V" cut in the big washer to let it pass through.
Now in order for the horn to work, we need the horn brush to be in contact with the centre terminal of the horn push. I had some stuff in the garage given to me by a mate that is a bit like metal sellotape. It's definately conductive, and sticky. I cut some to shape and pushed it under the centre terminal so that it was in contact.

Now when the horn push is pushed on the steering wheel, the horn brush makes contact with the metal tape.
When the horn is pressed, the circuit is completed and the horn goes PARP!!
Please feel free to comment on my blog by clicking on the "comments" link below.
On the horn grounding segment at the end of the blog, I have the same issue...the wire between the rubber bushing has snapped off of the ring connector...if I touch the wire to the ring connector, the horn work...when separated, it does not....how can I connect the wire with 2 ring connectors to the rubber bushing without having the steering column separate?
ReplyDeleteI had the same problem with the steering doughnuts and had tried clamping them with a C-clamp, but it interfered with the myriad things that are present in the TR-4. Thanks for posting the picture in your blog.
ReplyDeleteLol. Steering column problems were much worse when it was stuffed into the back of a tr6 and the engine fell out!
ReplyDeleteGreat article, this has been a real help for me with my GT6.
ReplyDelete